
Are you looking at how to backup contacts on Samsung Galaxy S10? If yes then this article will describe to you how to backup contacts on Samsung S10/S10+.
In the previous blog, I discussed how to recover deleted data from Samsung Galaxy S10/S10+, and now it’s time to know about some preventive measures that can help you to avoid any kind of data loss from your new Galaxy S10/S10+.
Everyone knows that data loss is a painful thing that nobody would love to face it.
So, before it becomes too late, you should back up all your crucial stuff from the phone and keep them in a safe place. This blog will help you with how to backup Samsung S10 so that you don’t have to worry about any data loss.
Let’s move to the best way to backup Samsung phone easily.
Let’s Directly jump to Solutions:
Method 1: Use Android Backup & Restore Tool (Highly Suggested)
There are many professional tools, which can help you to back up your Samsung phone. It means that these are the alternatives that you can use when you don’t use the above-mentioned backup ways.
One of the important tools in this situation is the Android Data Backup & Restore Tool. This is effective and advanced software that allows you to back up every important content from Samsung Galaxy S10/S10+/S10e and other brands as well. With the help of this tool, you will know how to back up photos on Galaxy S10 and other data as well.
Your data such as contacts, photos, documents, videos, messages, WhatsApp messages, and others are backed up with ease. And whenever you face any kind of data loss situation then this useful tool will allow you to restore every erased data from Android devices.
So all in whole, this is one of the best ways to protect your valuable data from loss in the future. Therefore, now it’s time to Free Download Android Backup & Restore tool and keep all your data safe and secure.
Free Download Android Backup & Restore Tool


Follow the steps to backup and restore Samsung Galaxy S10/S10+
Method 2: Backup and restore with Google account
This is one of the easiest methods to back up Samsung phones. In this, you have to allow permission to Google so that it can back up all your stuff. Whenever you set up your phone, you need a Google Account to do it, and adding an account will do your job.
You don’t have to do much about it, only go to Settings > Google > Backup.

If you have a Samsung phone then go to Settings > Cloud and account > Backup and restore > Google account.
For a Google Pixel phone or some other, you have to go to Settings > System > Advanced > Backup to Google Drive.
Here you can also select which data to back up or not. When you are in Settings, go to Settings and tap on Google account and then select Account sync. For Samsung devices, go to Settings > Cloud and accounts > Accounts > Google > Sync account.

Your important data can be easily backed up with this method and whenever you need to restore them, it will be easily restored without any difficulty.
Method 3: Drag and drop data from device to PC and vice-versa
This is also one of the easiest methods of how to backup Samsung s10 to pc. Simply connect your Galaxy S10/S10+ to the computer via a USB cable and manually copy the entire data from it. After that paste them on the PC.
See the steps below:
Step 1: Switch on the Samsung Galaxy S10/S10+ device and enable USB debugging. Now on your phone, tap on Settings > About phone and then click on Build Number 7 times until a dialogue box appears saying “You are under developer mode”. After that, go to Settings > Developer options > USB Debugging
Step 2: Now using a USB cable, connect your Galaxy S10/S10+ to your PC, and a window will open where you will get access to internal storage as well as of SD card.
Step 3: Here you should copy the files you wish to backup and then paste them onto the drive of your computer.

That’s it.
In the same way, you can restore all your saved data from your PC to your phone by connecting your device via a USB cable, copying the entire data from the PC, and pasting them on your device.
Method 4: Backup and restore using Samsung Smart Switch Application
To access this app, you must install this application on your Windows or Mac computer. To download Smart Switch, you can click here for Windows and Mac.
Follow the steps to back up the data
- First, connect your Galaxy S10/S10+ to computer via USB cable
- Now on Smart Switch Screen, tap on More
- Here from Backup items, choose Preferences. Now choose the content that you wish to backup and then press OK
- After that, tap on the Backup option on the Smart Switch screen and it may take a few seconds to finish
- At last, you will see a prompt of the backup is over, only now tap on Confirm

Follow the steps to restore data from Samsung Smart Switch Application
- Ensure your device is connected to the PC via a USB cable
- Now tap on the Restore option on the Smart Switch screen
- Here you will get the recent backup. Click on the Restore button to restore the content. If you wish to restore previous backup data then you have a tap on Change data to restore and then choose a preferred backup file.
Method 5: Use ADB Utility to backup and restore Galaxy S10/S10+ data
- First, ensure ADB and Samsung USB drivers are installed on the computer
- Now connect your phone to the computer via a USB cable
- You have to enable USB Debugging from Settings > About and then click on Build Number 8 times. Now go to the main settings page and access Settings > Developer Options > Enable USB Debugging Mode.
- After that, hold Windows and R keys on the keyboard and type CMD, then press enter
- Type commandadb backup -apk -shared -all -f Path/To/Filename.abIf in Windows command prompt after which a prompt will occur to authorize your system, accept it.
- Now a window will occur on your Galaxy phone providing a full backup. Click on Backup my data and wait for some time until it is over. Once the process is finished, you will get a notification and returned to the home screen
- When you want to restore, connect your device with the command prompt open, and type commandadb restore Path/To/Filename.ab. Tap Restore my data when appears on the screen
Method 6: Backup and restore data using Samsung Cloud
If you access Samsung Cloud then it will be easy to back up and restore all crucial data from your Samsung Galaxy phone. It also allows you to restore files and sync data on other devices when logged in to the Samsung account.
Now follow the below steps to backup your data using Samsung Cloud
You should know that all your data gets automatically backed up every 24 hours but only when it is connected to a Wi-Fi network and the screen is off for at least an hour.
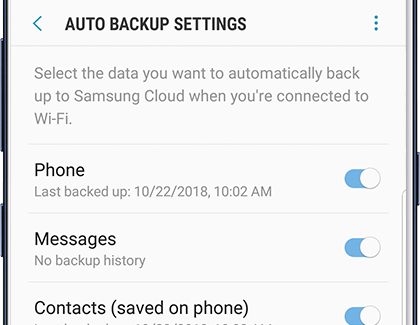
If you want to customize the files that are automatically backed up, then you have to go to Settings > search and select Samsung Cloud > touch More Options. Now click on Settings and click on Auto Backup Settings.
Go through the steps to restore data from Samsung Cloud
When you have backed up everything in Cloud storage, restoring data is simple. You need to go to Settings and search for Backup and Restore. After that, click on Restore data, select the device, and choose the data you want to restore.
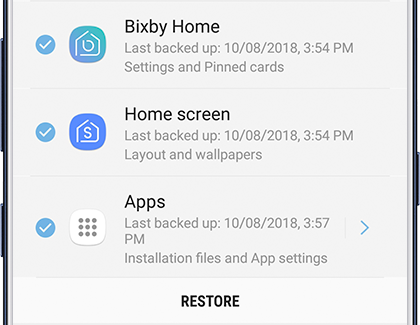
After that, click on the RESTORE option. For more instructions, you need to follow the on-screen instructions to download your data.
Conclusion
So, all these are some of the best ideas on how to back up and restore Samsung Galaxy S10/S10+/S10e. I hope these backup ideas will help you to back up your important content and you will never face any kind of data loss in the future.
If you have any more suggestions or queries then kindly mention them in the below comment section.
You can further reach us through our social sites like Facebook and Twitter

Harry Jhonson is a technical writer and has experience of 10 years in SEO. He gathers effective solutions to deal with all problems like data recovery, errors, and others related to Android & iOS (iPhone/iPad/iPod Touch) devices.