iOS Full Data Eraser
After you launch the software on your computer, you can see several features as mentioned below. From there, you have to select Erase option.
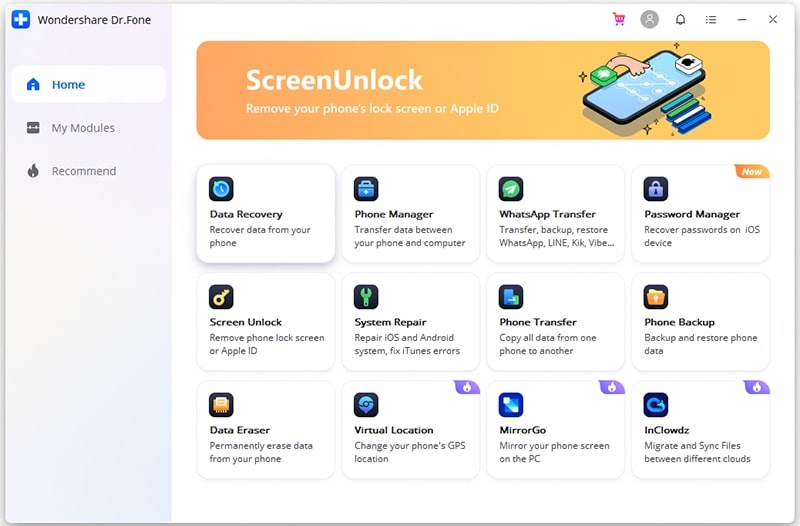
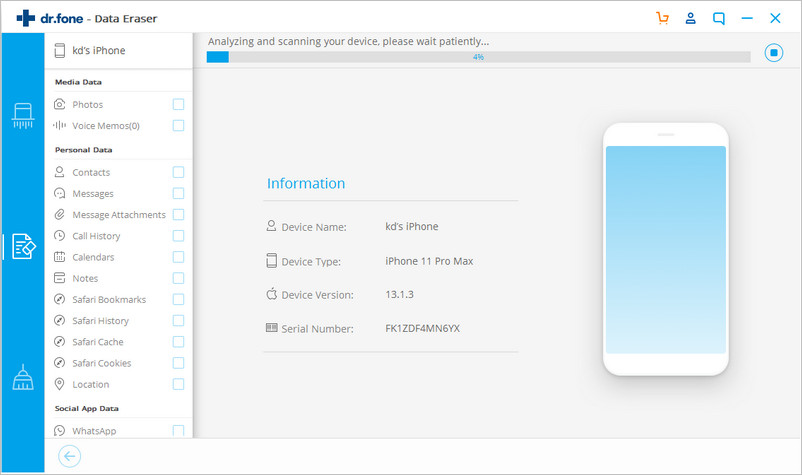
Now here you can see how the software works to erase data from iPhone completely.
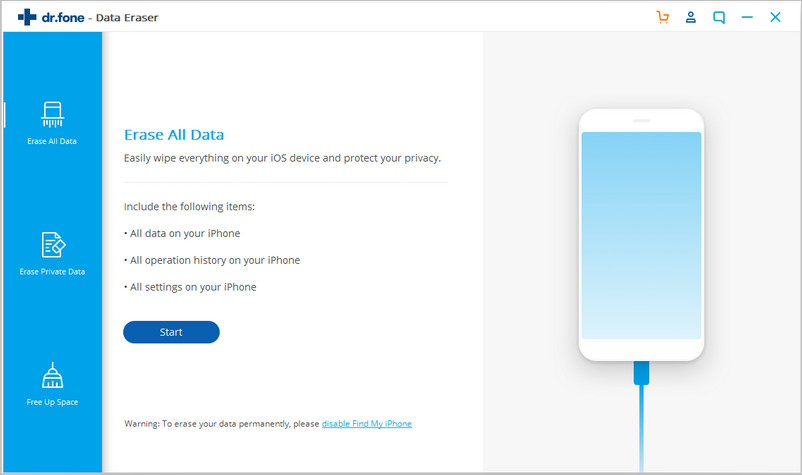
Step 1. Connect your device to the computer
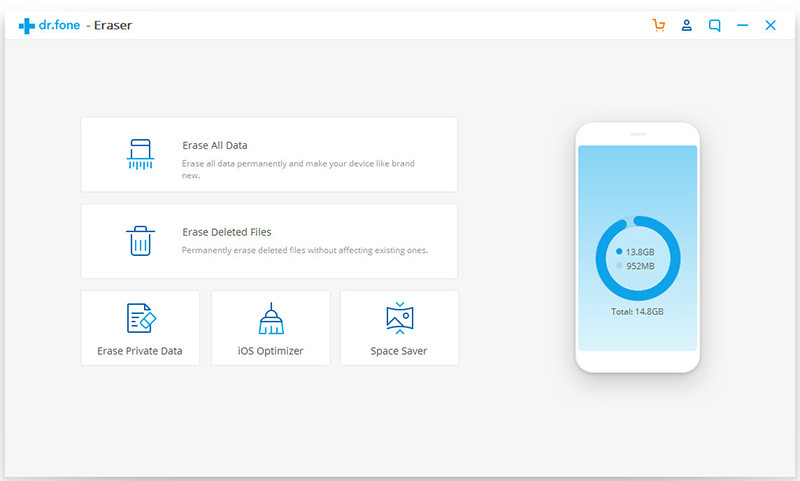
First, connect your iPhone or iPad to the computer via USB cable. After it detects your device, it will show you 4 options. From there you have to select “Erase All Data” and begin the process.
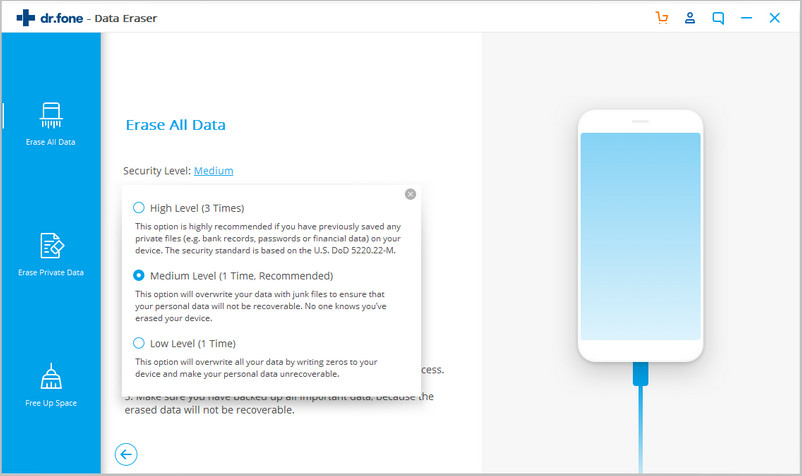
Step 2. Now begin erasing your iPhone completely and permanently
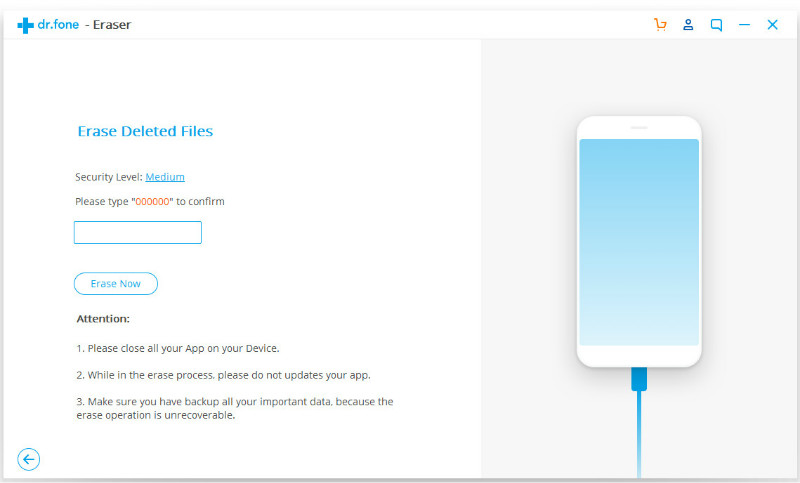
After that software detects your device, you can choose security level to erase iOS data. The higher security level, the low chance to recover data from the phone.
As the deleted data cannot be recovered so you need to be careful and enter “000000” to confirm the process.

Step 3. Now wait until the data is completely deleted
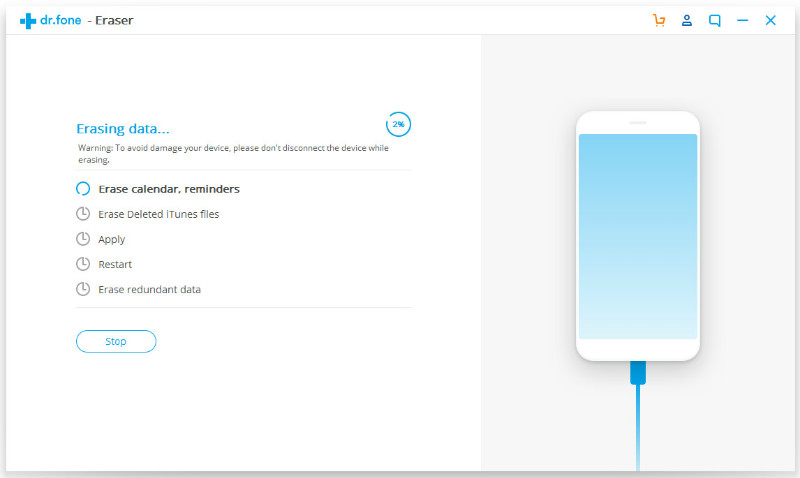
As the data deletion begins, you don’t have to do anything but wait till the end process and make sure your device is connected.

Here the program need to confirm the rebooting your iPhone and then click on “OK” to continue

Now after the data eraser is over, you will see the below window

Now your phone is completely deleted and it turns into a new device and you can start to set up your device as you wish
iOS Private Data Eraser
First, launch the powerful software on your computer and select “Data Eraser” among several options
After that follow the steps to erase your private data
Step 1: Connect your device to the computer
Connect your iPhone or iPad to a computer via USB cable. Now hit on Trust on your iPhone/iPad screen just to make sure your device gets connected properly
Now when your device is recognized by the software, it will display 4 options where you have to select Erase Private Data to continue.
Step 2: Now scan the private data on your iPhone
To delete your private data on your iPhone, you have to scan private data first. For that click on the “Start” button to begin the scanning process.

It will take some time but you have to wait until you found private data in the scan result
Step 3: Now begin deleting private data on your iPhone permanently
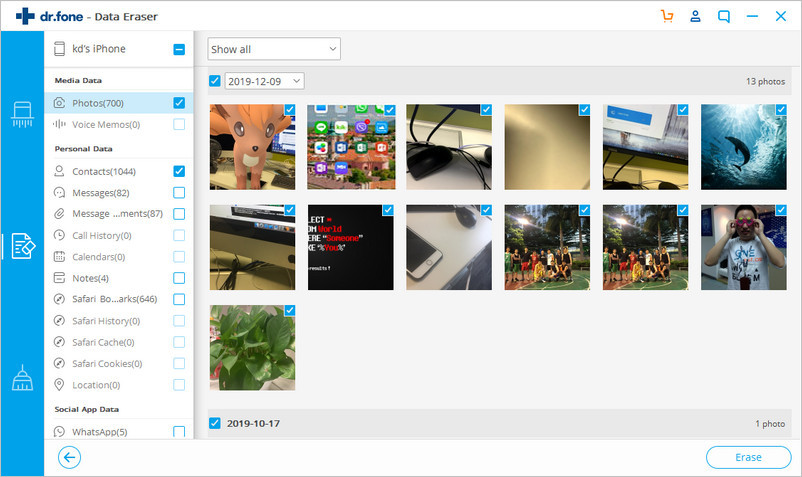
Here you can preview all your private data like contacts, photos, messages, call history, etc. Now here you have to select the data you want to erase and then click on Erase option to begin the process.
As you know the erased data will not be recovered again, so you have to be careful. Enter “delete” inbox to confirm the deletion and click on “Erase Now”.
The program allows you to delete the data (marked orange) from iPhone/iPad. For that, click to expand the drop-down list and choose ” Only show the deleted”. After that, choose records and tap on “Erase”.

Since the data cannot be recovered again, you don’t have to worry about its return. Enter “000000” to confirm the erasing and tap on “Erase Now”.

Now you have to wait until your iPhone or iPad restarts on its own. Make sure you don’t restart your device to a successful data eraser.
iOS Deleted File Eraser
After you launch the software, you can several options on the interface. You have to click on the “erase” option.
After that, you have to follow the below steps completely to wipe the data
Step 1: Connect your device to the computer
Connect your iPhone/iPad to your computer via USB cable. After your device gets detected, you will see 4 options. Only you have to click on the “Erase Deleted Files” option.
Now the software will analyze the data that is deleted

Step 2: Now preview the deleted files and confirm the erasing.
The tool will scan the deleted files of all types
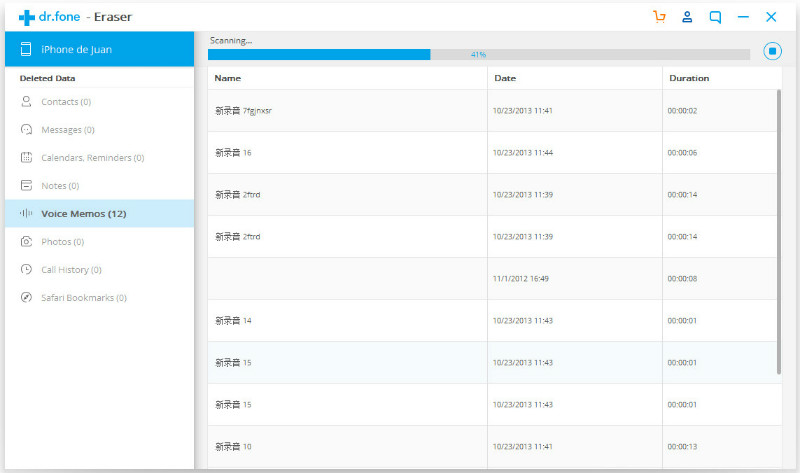
When the files are detected, you can preview the files types from which you have to select the files you want to erase and click on the “erase” option.

In the next screen, you have to specify the security level where you have to type the code that is required and click on “Erase Now” to confirm.
Step 3: Keep your device connected during the deletion process
Now the tool begins to erase your files permanently. Don’t forget to keep the device connected until the deletion is over
In between the process, your iPhone/iPad may reboot. In this situation, you have to enter your passcode to continue

At last, the software completely wipes the files in-depth

iOS Optimizer
First, you have to install the Data Eraser software and click on “Erase” to get all the features
After that follow the instructions below mentioned
Step 1: Set up the connection between your iDevice and PC
Connect your device to your PC via USB cable and when your device gets detected, you will see 4 erasing options and among 4, you have to select “iOS Optimizer”
Now in the other interface, you will see 6 optimization options

Step 2: Scan your iOS from all aspects
You can select all some optimization options and click on “Scan”
Now the Data Eraser software will scan your iOS device for all junk data

Step 3: Clean up all the junk data scanned
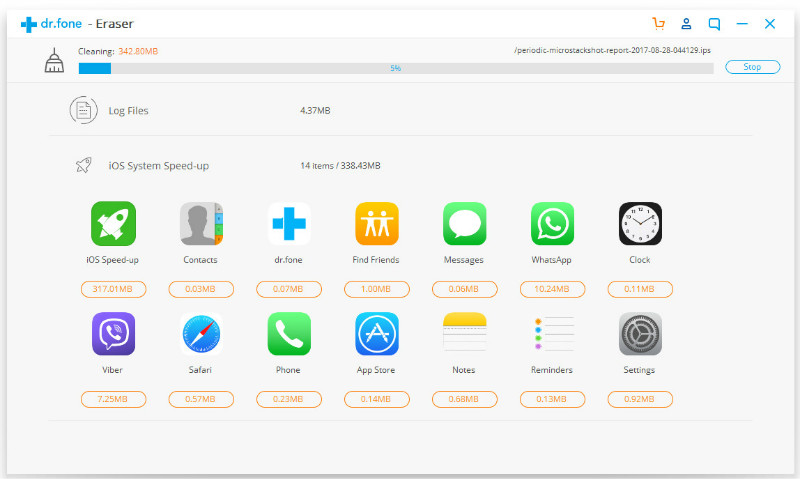
Here all the junk data like cached files, useless apps, log files, etc are scanned and listed on the screen. Select the junk categories and click on “CleanUp”

Then the tool will begin the cleanup process. In every item, you will see the amount of memory space to be gained after cleanup
In between, your device may be rebooted once or twice and here you have to enter a passcode after each startup

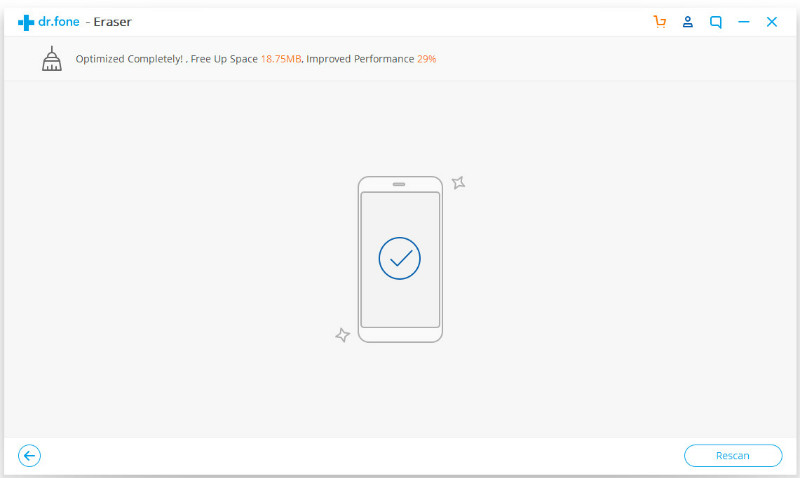
After the process is finished, you can see the below screen which also indicates that your device is optimized
iOS Space Saver
First, you have to launch the Data Eraser software and then click on the “Erase” option to start the space-saving feature
Then follow the below steps to free up space on your devices
Step 1: Connect your iPhone to PC
Use a USB cable to connect your iPhone or iPad to a computer and after the toll identifies the software, you will get 4 options. From them, you have to click on “Space Saver”
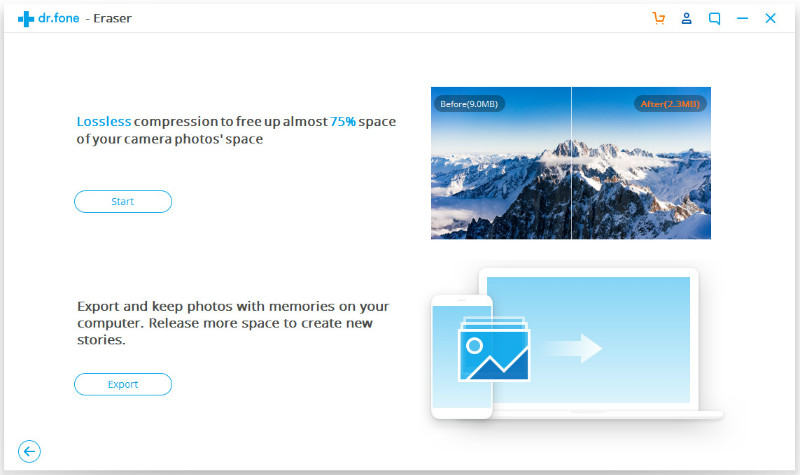
Step 2: Now compress iOS photos losslessly
A popup will occur in the screen where you have to click on ‘Start” to start the photo compression
Note: The compression remarkably compresses the photo size with little impact on the photo quality.

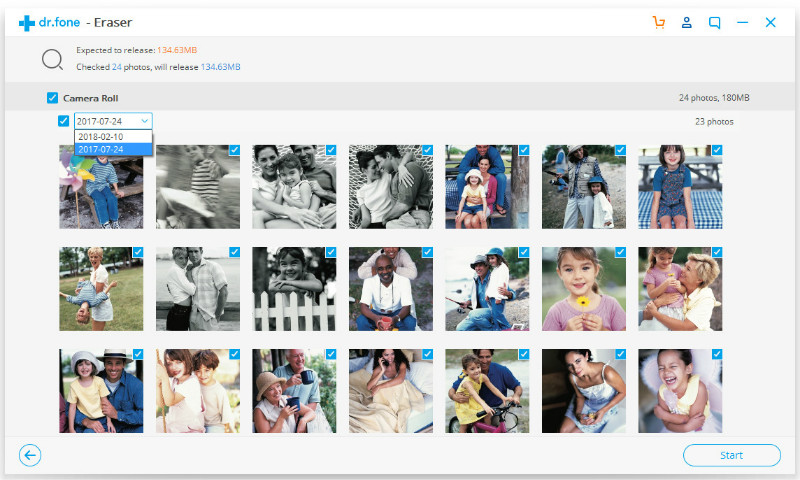
iOS Eraser will now scan the entire photos on your iPhone/iPad

After the photos are recognized and displayed, select date and choose the photos to be compressed and then tap on “Start”
Now you can see the compressed photos after the compression is over and space that is freed up
Note: You do not need to proceed to the next step if enough space has been freed up on your iOS device.

Step 3: Export the photos to PC (if not enough space is freed up).
Now in the initial screen of Space Saver, click on “Start” on the lower part to start exporting photos
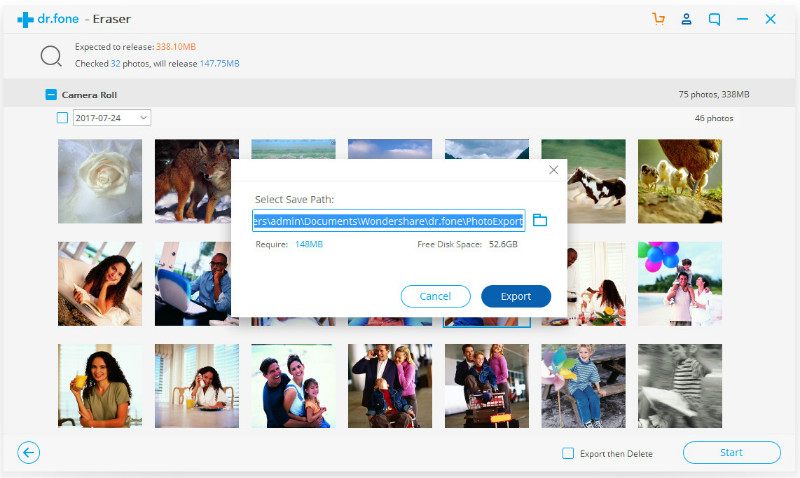
When scanning is over, different dates of photos are displayed on the screen. Select a date and all photos and then hit on “start”
Note: The “Export then Delete” option should be checked. Otherwise, the software will retain the photos on your iOS without freeing up any space.

Now select a directory on PC and click on “Export”
And at last, the below screen will occur which also states that export is successful
