Are you looking to sell or donate your iPhone to somebody?
Want to know what to do before selling or giving away your iPhone?
If you are still confused about this matter then don’t worry, I will help you here to deal with the situation.
In this blog, I will focus on what are the things you need to do before selling your iPhone. So let us begin…
Generally, if you see practically then many times whenever any new phone is launched just like iPhone 13/12/11/XS/XR/XS Max, then an expectation increases to buy the new model and to sell the old one.
It means that you have to prepare your old phone to sell it to anyone.
You should know that once your old phone gets out of your hand, you don’t have any control over it. And if you have any data on that old phone then it may be at your own risk.
So, why do such things that might trouble you later on? To make things easy, I have come up with some of the best things to do before selling your iPhone.
10 Important Things To Do Before Selling Your iPhone 13/12/11/X/XR
Now, it’s time to walk through what to do with old iPhone before selling. It’s very important to check your phone for everything before you give the device to anyone.
So let’s move ahead.
- Backup your phone
- Confirm the backup worked
- Remove any accounts on iPhone
- Switch off Find My iPhone
- Remove Your SIM Card
- Unlock your iPhone
- Delete all your data manually
- Restore your iPhone to factory settings
- Check iCloud
- Ensure everything is working on the new iPhone
#1: Backup your phone

The first and most important thing to do before you think to sell your phone is to do a backup of all your data.
Everyone stores lots of data on their devices starting from photos to contacts and emails to text messages that we never want to access by any other person.
Though deleting the entire data from the phone make some sense but before that, you should have a backup of all your essential things so that everything becomes easy to set up on your new phone.
Generally, if you see then iPhone users have two types of backups like iTunes backup and iCloud backup.
If you still have a backup here then also do a final backup of your data without any hurry. Follow the below steps to backup your data once again.
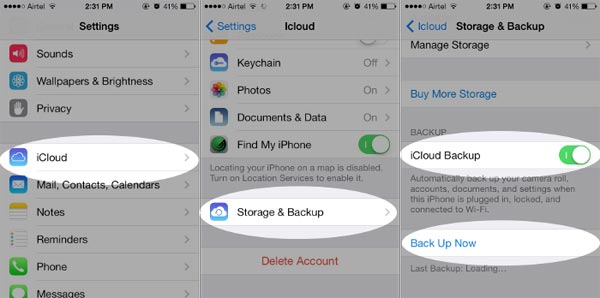
iCloud backup
- First, sign in to your iCloud account on your computer
- Then connect your iPhone through a USB cable
- After that, allow your computer to access the data from iPhone
- Here you have to select “Settings” in iCloud account > iCloud > Backup > Backup Now
- At last, confirm all your backup by checking the “Latest Backups” option
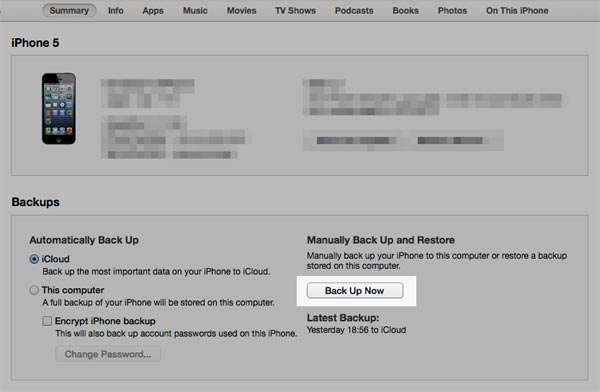
iTunes Backup
- First, open iTunes on your computer and connect your device via USB cable
- Now let your computer access your phone’s data
- Here choose “Summary” from Settings and under Backups, choose This Computer
- Make sure you have selected “Encrypt iPhone Backup”
- Now choose the “Backup Now” option
- At last, confirm the backup was successful by checking “Latest Backup”
External USB
Many users have a choice to save their data on external storage so for them, the iPhone flash drive is the perfect one.
- First, plug a USB into your phone
- Then download the app linked with a flash drive
- Now, launch the app and choose “External Storage”
- Here you have to select the data you wish to backup and at last, choose the “Save” option
#2: Confirm the backup worked
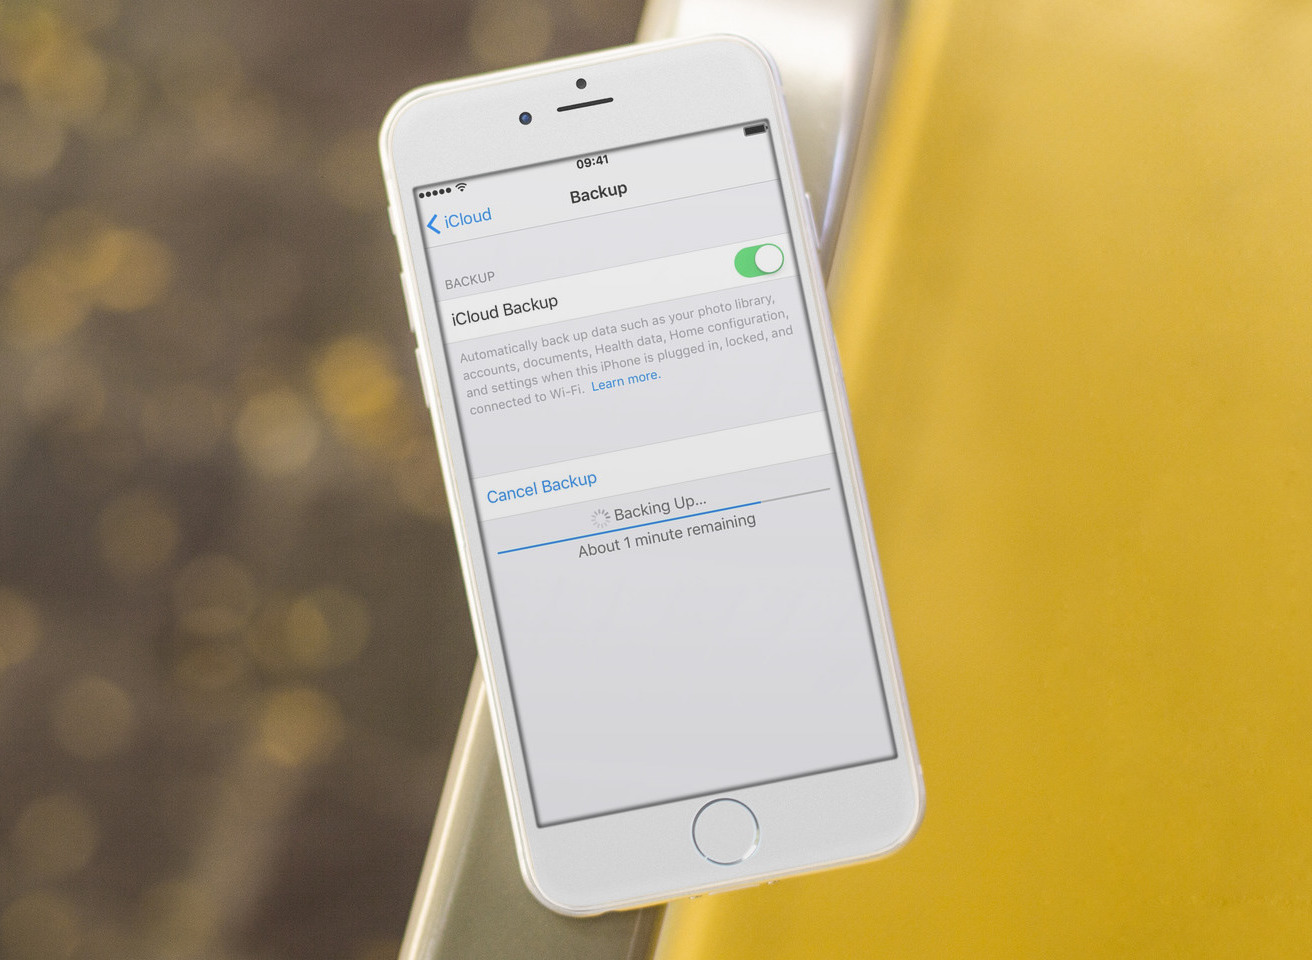
After taking a backup of all your data, now it’s time to see whether the backup is working or not. This option is to ensure whether everything is properly backed up and nothing is missing.
It will be painful to delete all your data once without keeping backup, so before you go to other steps, ensure all information is backed up in iCloud and iTunes.
If anything is not backed up then immediately back up those missing files and give yourself a confirmation that everything is stored on your storage media and nothing is left.
#3: Remove any accounts on iPhone
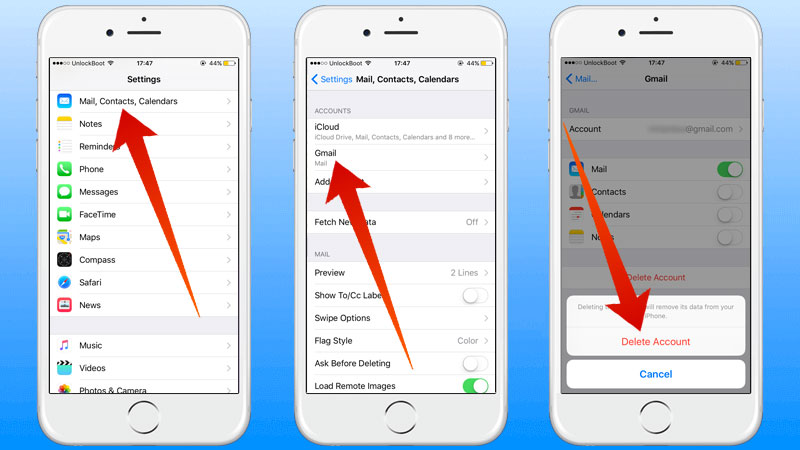
You might have several accounts on your phone like Facebook, you should remove all those accounts from your phone without forgetting.
Remove all such kinds of accounts associated with your iPhone and do it especially when your account doesn’t have two-factor authentication.
Below mentioned are the steps to remove the account from Facebook and the same process have to follow for other linked accounts also like bank accounts, iCloud, iTunes, Amazon, Instagram, etc.
Steps to delete Facebook account from iPhone:
- First, sign in to your Facebook account from the computer
- Now select “Settings” and then “Security and login”
- After that, go to “Authorized logins”, search for the phone in the list, and choose “Remove”
- Here you will see the “Where you’re logged in” option
- Search your iPhone from the list and choose “Log Out”
- Now open the app on your iPhone just to ensure you are not logged in
- At last, delete the Facebook app from the old iPhone
#4: Switch off Find My iPhone
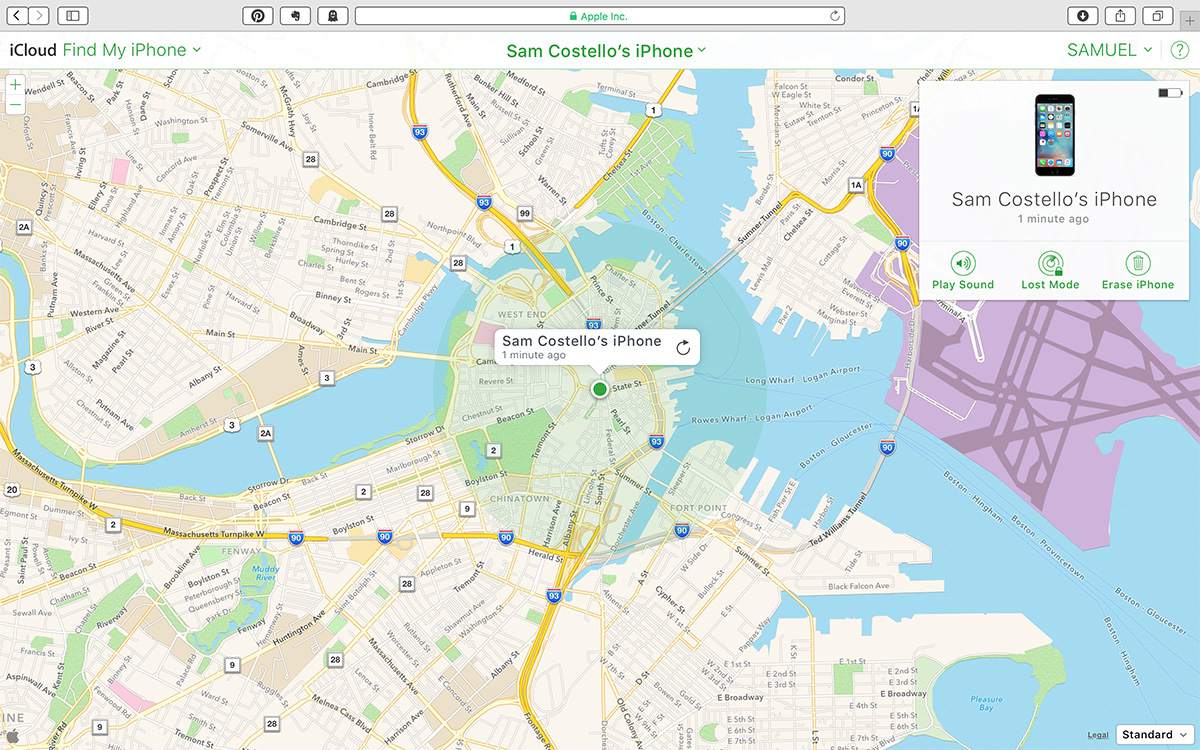
This is one of the crucial steps to follow. If you have ever used Find My iPhone option then there is a high chance of getting enabled the Activation Lock feature.
To access it, the original Apple ID is required and this is the powerful anti-theft feature. This option is a great help for users to stop thieves but when you decide to sell your phone then you should turn off this feature otherwise the buyer of your old phone will never access it.
So, you should turn off Find My iPhone before you move forward and think to sell it. This is a very important step to do when the feature is enabled.
#5: Remove Your SIM Card

The person you are selling your phone wants to see whether the device is working or not.
In this situation, you should keep your SIM card on your phone unless he/she checks your device and satisfies himself.
When everything is confirmed, remove the SIM card by following the steps:
- First, insert a small paperclip into the SIM tray
- Now apply pressure unless the tray pops open
- After that, pull the tray out and remove the SIM card
- At last, replace the tray with iPhone
#6: Unlock your iPhone
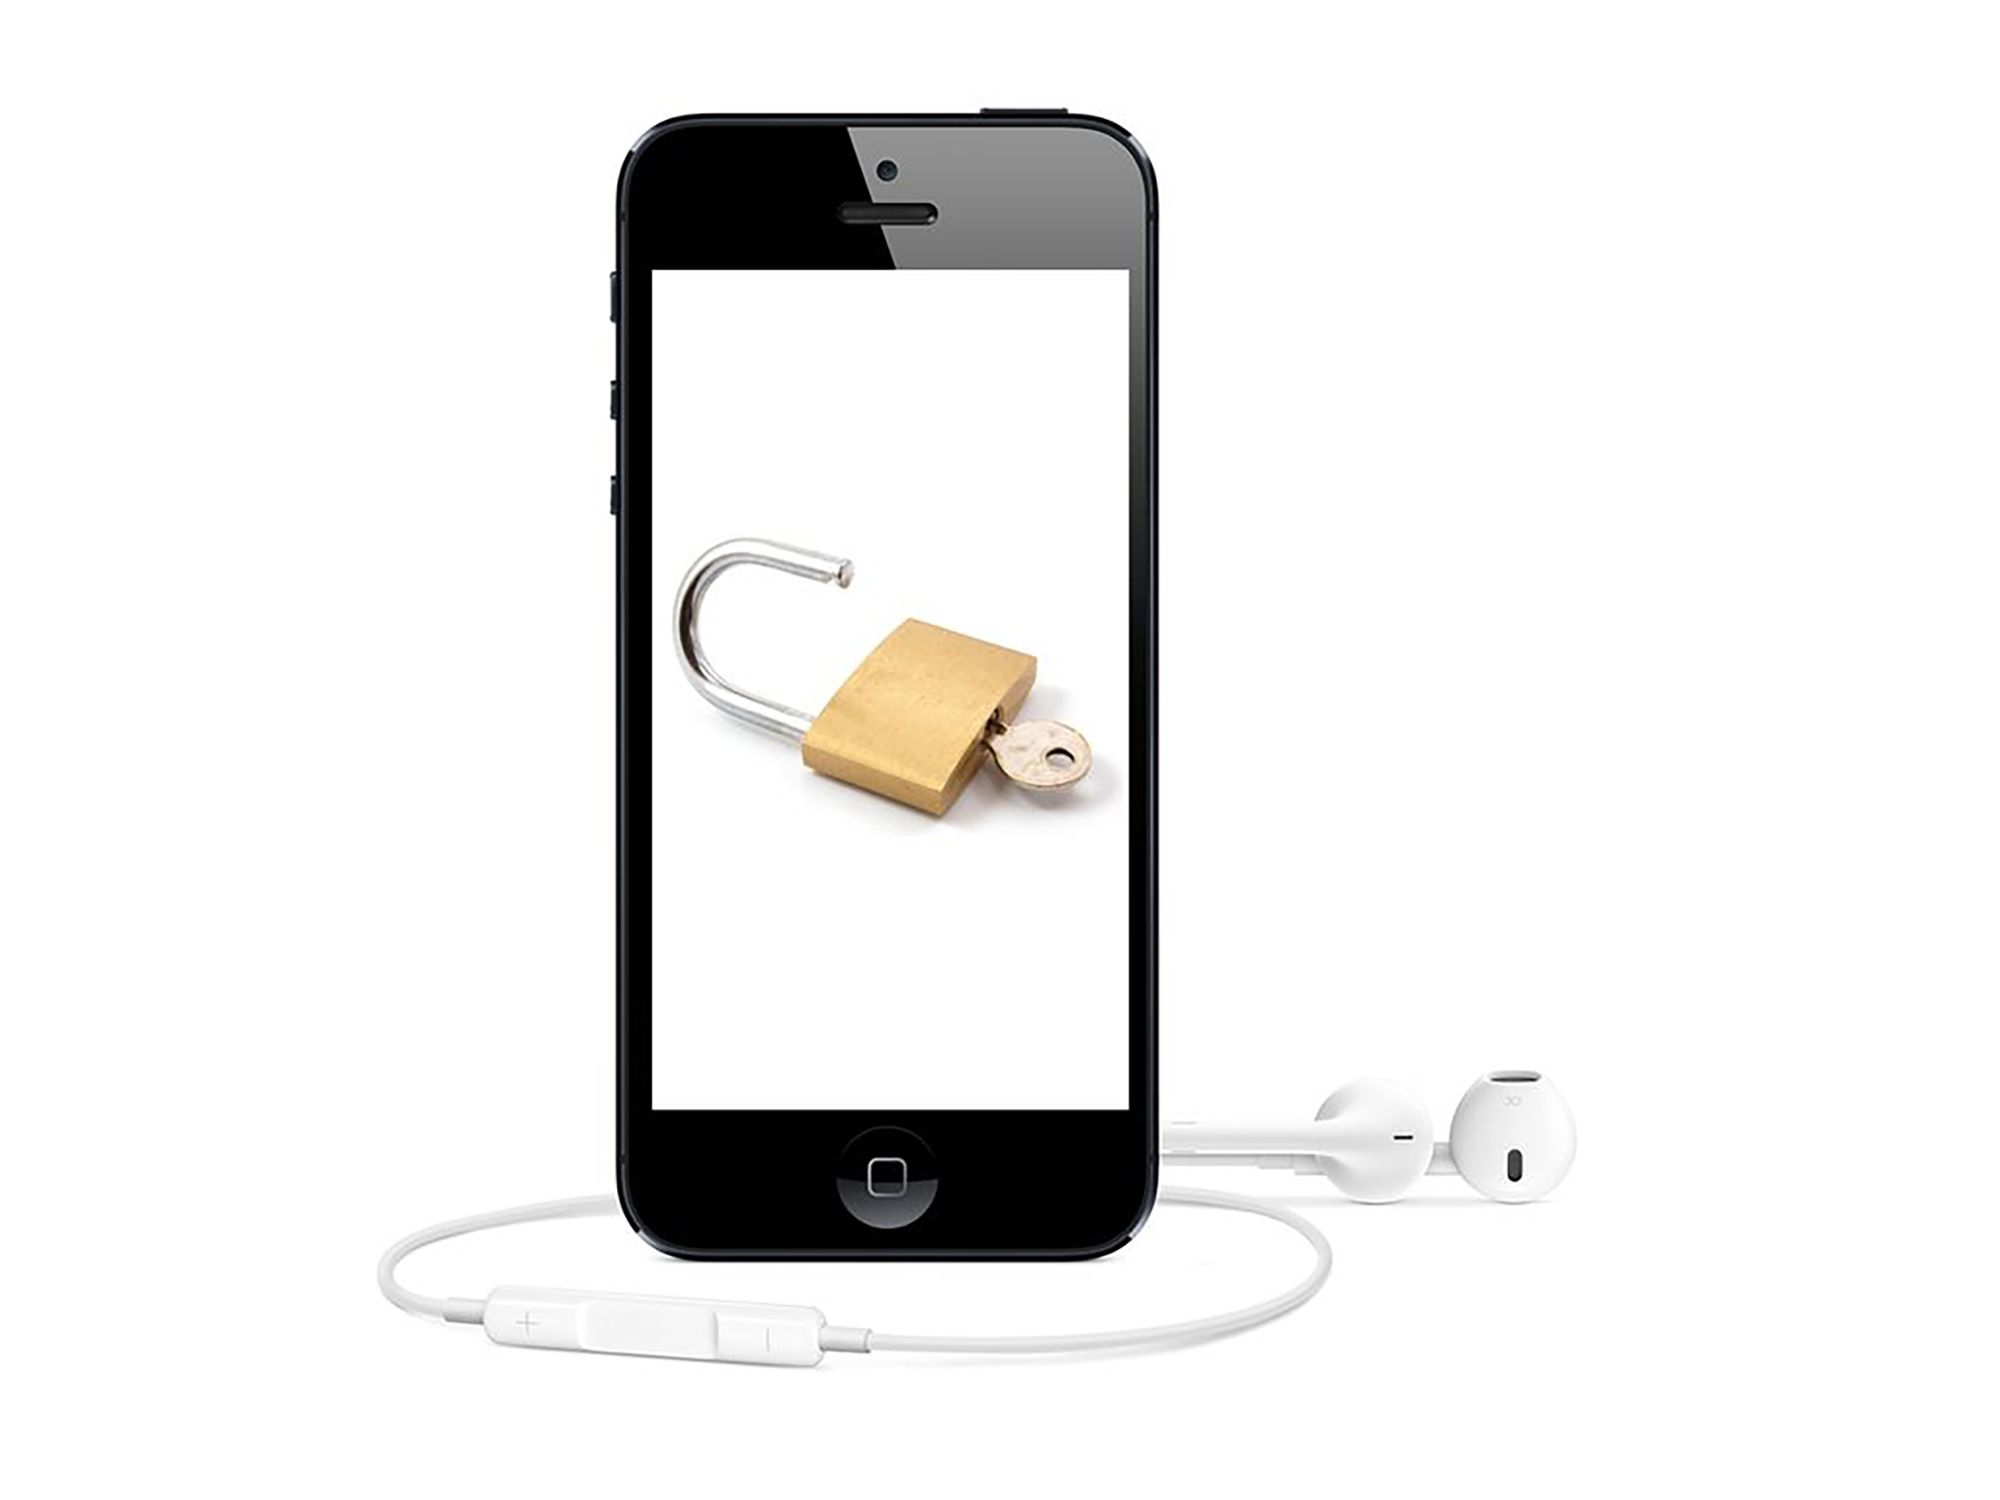
This one is not so important because many of them use unlock feature on their devices.
Generally when your iPhones are activated then they are locked to a single network. But after some time, they can be unlocked that also let them work with any network.
If you selling an iPhone that is not locked then it will be easy for the buyer to sell it to any other person.
In fact, this is more profitable when you are selling it to an iPhone trade-in company.
#7: Delete all your data manually
You should also delete all your data or stuff from your iPhone manually. The below-mentioned things are important to be deleted manually.
They include:
- Social media accounts
- Fingerprints
- Email accounts
- Photos
- All apps
- And other data that you think to be deleted
Some stuff is not to be deleted unless you start a fresh new Apple ID. Avoid wiping those items that were shared with your devices using your Apple ID.
#8: Restore your iPhone to factory settings
When you safely remove all your data and files from your old phone to a new one, now you are free to erase your phone completely.
And in this context, the factory setting is the best and easy one to follow. Using this process wipes out every data and setting and makes the phone in a normal state as it was at the time of buying.
But also remember that before you do Factory Reset of your device, note down your IMEI or MEID number so that you can give it to the owner. Now follow the below steps to do a factory reset your iPhone:
- First, go to Settings on your iPhone
- Now you have to choose “General”

- After that, select “Erase All Content and Settings”
- At last, Restart your phone just to check the reset was successful or not
#9: Check iCloud
After you have done a factory reset of your device, now your device doesn’t have any data except the iOS and the built-in apps. It means that your old iPhone is ready for its new owner.
But how would you check whether everything has gone perfect or not?
The best way is to use iCloud and Find My iPhone. First, log in to Find My iPhone at http://www.icloud.com/find and check whether your old phone is showing on the Find My iPhone option or not.
If it does not show then make sure that everything has gone fine.

But sometimes your phone is shown in Find My iPhone option and at that moment, you have to use Erase your iPhone option.
Only you have to select your phone and remove it from your account. If you ignore this process then your buyer will not be able to use it because it will be in a locked state.
#10: Ensure everything is working on the new iPhone
Now, the last step is to check your new phone whether the service is working on it or not. All your important data and stuff are now transferred to your new iPhone from the old one.
Check properly that every service is working perfectly and if it shows problem then contact the company to make everything works well without any problem.
Additional Bonus Tips for iPhone users
- Turn off iMessage by simply going to Settings > Messages > iMessage > Switch off
- Logout from Apple ID by going to Settings > App and iTunes store > click on Apple ID and then sign out
- Delete photos from Camera Roll. Only you have to connect your phone to the computer and open Image Capture or photo. Then choose all Photos and tap on Import All. Now on iPhoto, select “Delete photos from iPhone” after importing. When the “Delete items after Downloading” option is not available in Image Capture then you should try other ways like turning off Photos in iCloud on Mac and iPhone and after that restart both of them and you will get Delete
- Switch off FaceTime by going to Settings app > FaceTime > turn off
- Unregister your device
- Disable iCloud account by visiting Settings > iCloud > click on “Sign out”
- Can call your carrier and tell them to disconnect your device from your own account
Conclusion
So, all these are some of the best 10 things to do before selling your iPhone. I hope all these are the basic things that everyone should follow before they think to sell or donate their iPhone to others.
When you think to sell your iPhone, don’t forget to follow all these tips and after that only, you should move ahead to sell your phone.
If you have any suggestions then don’t forget to drop a comment in the below comment section.
You can further reach us through our social sites like Facebook, Twitter

Sophia Louis is a professional blogger and SEO expert from last 11 years. Loves to write blogs & articles related to Android & iOS Phones. She is the founder of Android-iOS-data-recovery and always looks forward to solve issues related to Android & iOS devices