Did you stuck on a “Verizon provisioning error” on Android phone? Are you wondering why this kind of issue is popping up and how to get rid of it? Well, I must say that you are not the only one to experience it.
Lots of Android phone users have recently reported this kind of issue. It generally occurs while users try to activate any new device on Verizon. But there is nothing to worry about.
In this article, we will go through some of the effective methods to fix Verizon Provisioning error on Android phones.
How To Fix “Verizon Provisioning Error” On Android Phone
It’s time to find out the best fixes for Verizon provisioning failed error on Android devices. Though it may occur due to several factors now, let us go through its solutions.
- Restart Your Android Device
- Reinsert SIM Card
- Change Your Wi-Fi Network
- Update Messages+ App
- Activate CDMA Less Provisioning On Website
- Deactivate/Activate Cellular Data Option
- Eliminate Additional Devices From Verizon Messages+
- Uninstall Updates Of Message+
- Reset Network Settings
- Advance Solution To Fix Verizon Provisioning Error On Android
Fix 1: Restart Your Android Device
You might be aware that a slight bug or glitch can stop your device to perform effectively. In such a situation, you should restart your device and then see if the issue is resolved.
Here is what you have to do:
- First, press the Power button on your phone
- Then, select the Restart option from the menu
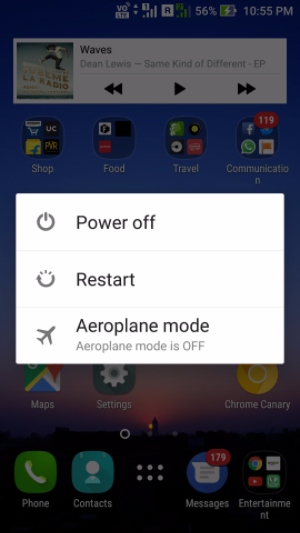
- Now, wait unless the device restarts
That’s it, now check if the error is resolved or not, otherwise move to the next solution.
Fix 2: Reinsert SIM Card
Another best way to get rid of the error is by reinserting the SIM card. Hopefully, this process will solve Verizon provisioning error.
Check out the below steps:
- First, turn off your device and remove the SIM card
- Then, wait for a few seconds before you reinsert it

- After that, put the SIM card in the tray and switch on your phone
Once everything is done, check if the same issue is popping up again or not.
Fix 3: Change Your Wi-Fi Network
Have you checked your WiFi connection as it may be the culprit for such kind of unexpected error? Sometimes, ISP restrictions can lead to provisioning errors. Therefore, you are suggested to change the WiFi network you are using.
Follow the below steps:
- First, you need to disconnect your device from the WiFi network you are using
- Then, connect your phone to another Wi-Fi connection
- Once done, open Verizon One Talk and see if everything is working fine
Fix 4: Update Messages+ App
When the same issue continues to pop up on the Messages+ app then it can be the reason for an old version of the app. It means that your device’s OS is not supporting the app’s old version.
So you are suggested to check and update the Messages+ app. This will surely help to get rid of the issue hassle-free.
Check the below steps:
- First, you have to open Google Play Store on your phone
- Then look for the Messages+ app
- After that, see if there is any update available for the app
- If yes then click on Update option

That’s it.
Don’t Miss: 11 Methods To Fix Verizon SIM Card Not Working
Fix 5: Activate CDMA Less Provisioning On Website
Missing CDMA radio on Verizon is yet another reason for the provisioning failed error. Because your device will not receive any messages so such kind of error occurs. In this situation, you can enable the CDMA-less feature.
Here is what you have to do:
- First, go to Settings on your Android device
- Now, tap on About phone
- Next, copy IMEI2 that is under Available SIM

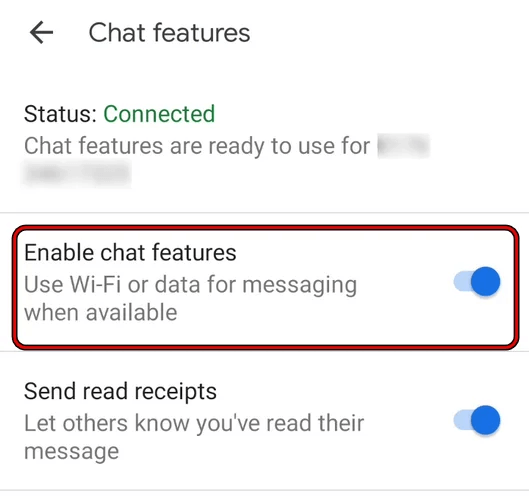
- After that, open the Messages app and click on More Settings
- Then, choose Chat Features > switch off Enable chat features
- Next, open the Verizon website on your browser
- Thereafter, open Accounts > tap on My Devices
- Now, select Activate or Switch device > Activate on an existing line

- There, select Line and paste the IMEI2 number

- Then, follow the on-screen options to complete the activation process
- Now, switch off your old device and switch on the new one
- After that, connect your device to WiFi and activate Verizon eSIM
- Finally, check your email for the QR code to initiate eSIM
Fix 6: Deactivate/Activate Cellular Data Option
When your device’s cellular data is misconfigured by any means then also there is a chance to come across Verizon provisioning error. So what you have to do is, simply turn off and turn on the cellular data features.
Here are the steps as guided:
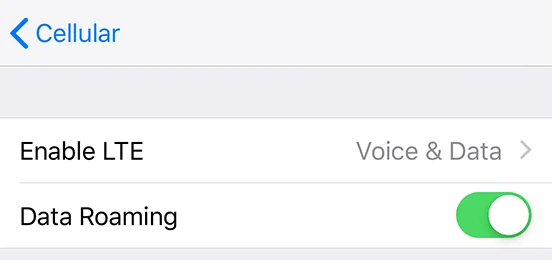
- First, open Settings > Cellular option
- Then, choose Cellular Data options > disable the features that are shown on the screen. Remember, some features may not occur due to various iPhone models

- After that, restart your device and then, turn on all the features selectively. Now check if the issue is resolved or not.
Fix 7: Eliminate Additional Devices From Verizon Messages+
You should know that only 5 devices are allowed to connect to your Verizon Messages+ account. If it exceeds then users can get a provisioning error on Verizon. So it’s recommended to remove any extra devices to get rid of the issue.
Follow the below steps:
- First, open the Verizon website on any browser
- Then, launch My Verizon > choose My Devices
- After that, open Manage Connected Devices > tap on Manage Message+ Devices
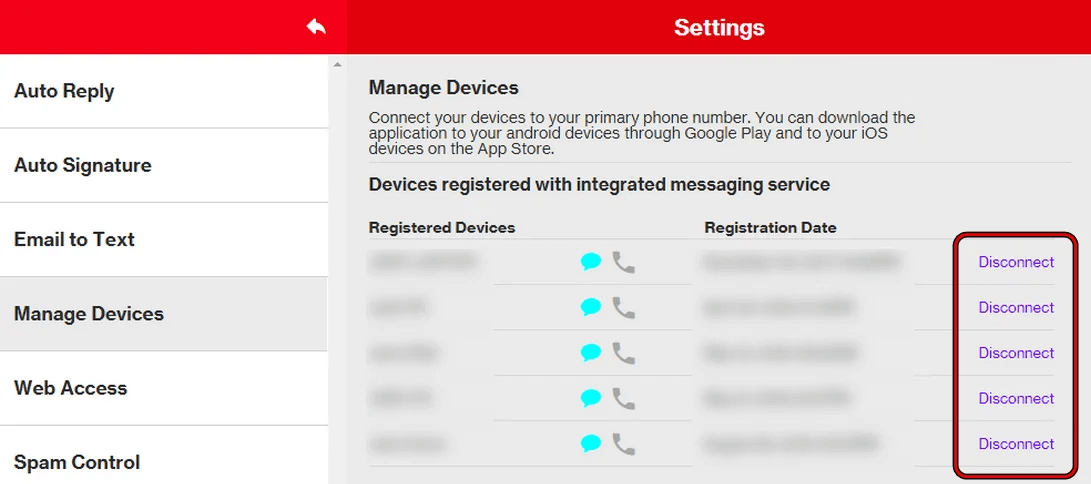
- Next, remove or delete extra devices from there.
- Finally, check if the provisioning error is fixed or not
Fix 8: Uninstall Updates Of Message+
It happens most of the time that after updating the app, it starts to show an error. It’s because the latest update is not compatible with the phone’s OS. So it’s suggested to uninstall updates to get rid of the error.
Check the below steps as guided:
- First, launch Settings on your device
- Now, choose the Apps option
- Then, move down and choose Message+
- After that, click on three dots on the upper right side and choose Uninstall Updates
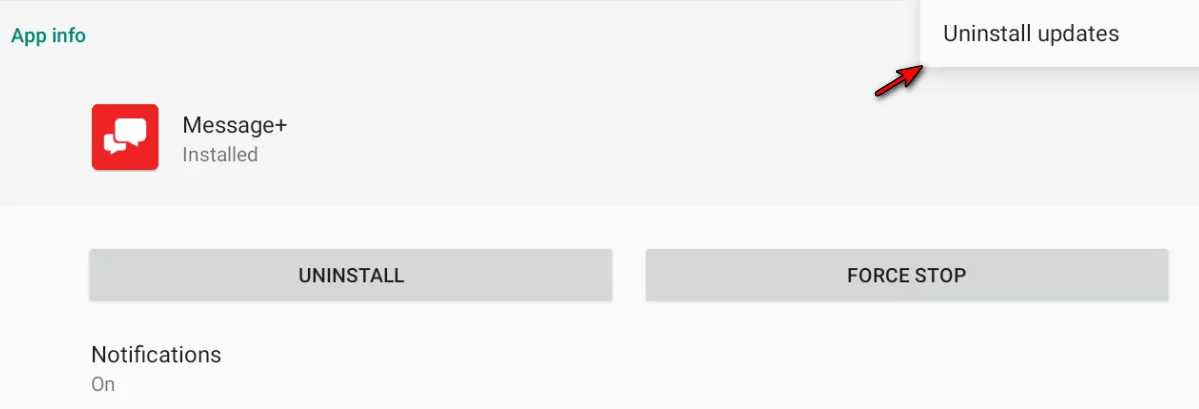
- Finally, click on Confirm option
- When done, restart your phone and check if everything is working smoothly without any error
Fix 9: Reset Network Settings
Another useful way to fix provisioning failed errors is by resetting the network settings. When the network settings get corrupted due to any reason, you may encounter such an issue.
Therefore, you are suggested to go ahead and reset network settings to default. But this process is risky as it can delete your data. Therefore, you should create a backup of all essential data and files in a safe place. Use Android Data Backup & Restore tool to back up all data with one click. It’s a professional software to backup as well as to restore data with ease.
Now, follow the below steps:
- First, open Settings on your device
- Now, launch System Settings
- Then, move down > choose Backup and reset
- After that, select Reset phone > tap on Reset network settings

- Here, enter your password, fingerprint, PIN, etc to verify
- Finally, restart your phone and see if the issue is resolved
That’s it.
Fix 10: Advance Solution To Fix Verizon Provisioning Error On Android
Are you looking for any professional tool to fix any type of issues on Android phones? If yes then you don’t have to look anywhere. Simply go for the Android Repair tool to fix all types of errors or issues on Android phones including Verizon provisioning error.
This is an easy-to-use tool that works effectively to get rid of such unwanted problems with one click. Some errors this tool has already fixed include settings has stopped, invalid SIM card, SIM not provisioned mm2, Samsung black screen, and others.
Free Download Android Repair Tool


Conclusion
So this blog ends here and I hope that you have successfully fixed the Verizon Provisioning error on Android. The reason for such error can be several but nothing to get worried about. Follow the methods and get rid of the error hassle-free.
Also suggested using Android Data Backup & Restore tool to create a backup of all your important data so that no data loss happens.
Further, if you have any suggestions or queries then drop them in below comment section.
You can further reach us through our social sites like Facebook and Twitter

Sophia Louis is a professional blogger and SEO expert from last 11 years. Loves to write blogs & articles related to Android & iOS Phones. She is the founder of Android-iOS-data-recovery and always looks forward to solve issues related to Android & iOS devices