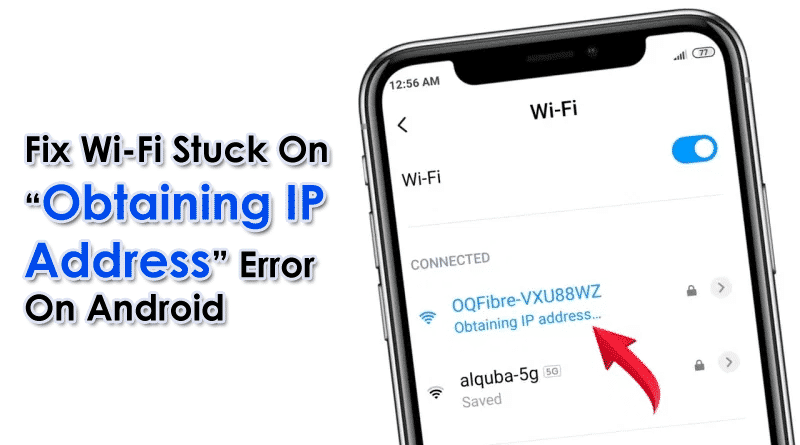
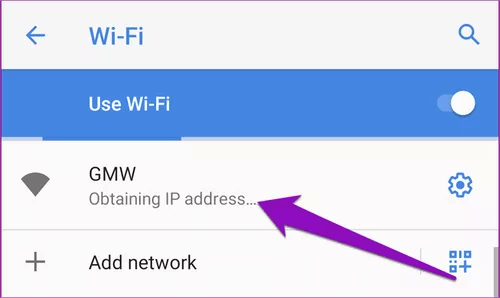
Did your Android phone stuck on the “obtaining IP address” screen? Wondering why is my wifi stuck on obtaining IP address. Well, if you are going through this error then don’t worry. Not only you but lots of other users have the same problem.
Android phone users are very much aware that lots of errors or issues occur while connecting their device to the internet especially while using Wi-Fi. Among all, “Obtaining IP Address” is one of them. It generally occurs while joining a Wi-Fi network.
But sometimes, it pops up an error, and users have to face lots of issues. So if your Android phone also says “Obtaining IP address” then read this blog for some best fixes.
What Does “Failed To Obtain IP Address” Mean?
When you get Wi-Fi stuck in obtaining IP address, it means that there is a problem while connecting to a Wi-Fi network. There can be several reasons for this error.
Some of them are mentioned here:
- WiFi signal is not strong
- The router is having some problems either configuration or malfunctioning issue
- Software error on the phone
- The phone does not work properly with some set of encryption methods
- Might be your address is whitelisted
How Do I Fix Wi-Fi Failed To Obtain IP Address On Android?
To get rid of the error, there are several fixes. Here some of the best possible solutions are mentioned that you need to follow to fix the problem.
- Reboot Your Android Phone
- Reboot Your Router
- Toggle Airplane Mode
- Disable And Enable Wi-Fi
- Reset Your Router
- Forget Your Wi-Fi Network
- Turn Off Private DNS On Android
- Assign A Static IP To Your Device
- Install FXR Wi-Fi Fix App
- Go Closer To Your Router
- Check If Your Device Is Blocked
- Change Your Device Name
- Turn Off MAC Filtering On Your Router
- Check Router’s DHCP Settings
- Set Up WPA2-PSK On Your Router
- Change The Wireless Channel
- Reset Network Settings
- Change Your Wi-Fi’s Encryption Mode
- Factory Reset Your Android Device
Solution 1: Reboot Your Android Phone
Whenever you come across any kind of error on your Android phone, many experts suggest restarting your phone. This is highly suggested because rebooting has the power to solve any type of errors or glitches on Android. So if you are getting the “Obtaining IP Address” error on the screen then restarting the device can solve it.

But if this method does not help you then move to the next one.
Solution 2: Reboot Your Router
Many times, the error occurs because the router fails to assign an IP address for that particular network. In that situation, you need to reboot your router to fix the issue.
But remember that there is no guarantee that doing this step will help you to get rid of the error. Simply use the Power button on your router, turn it off for 30 seconds, and again plug in to check the issue.
Solution 3: Toggle Airplane Mode
When the error continues then you can enable Airplane mode on your device. This will disable all the services along with Wi-Fi.
Follow the below steps to enable and disable airplane mode:
- First, pull down the notification bar and click on Airplane Mode

- Now wait for sometime
- After that, click on it again to disable airplane mode
Now check if the “obtaining IP address” issue is resolved or not.
Solution 4: Disable And Enable Wi-Fi
You can also disable and enable Wi-Fi to get rid of the error message. Simply swipe the notification panel and click on the Wi-Fi icon. Even you can go to Settings > Network & Internet and then toggle off the Wi-Fi network.
After that, do the same steps to enable it on your phone. Try to reconnect your device to the network and see if the Wi-Fi stuck obtaining IP address error is resolved or not.
Solution 5: Reset Your Router
You have already restarted your router but it has failed. But you can reset it to get rid of the error. Remember, “reset” is different from “restart” in which all configurations are removed and the router is restored to factory state.
You can find the reset button on the router, simply press and hold unless it restarts. When the reset is finished, you have to configure the router again.
Solution 6: Forget Your Wi-Fi Network
If the problem continues then you can forget the Wi-Fi network manually and again reset it. This is easy to apply and resolves the error without any difficulty.
Here is what you need to do:
- First, go to Settings > click on Wi-Fi & Internet > choose Wi-Fi
- Now click on the cog icon and choose Forget
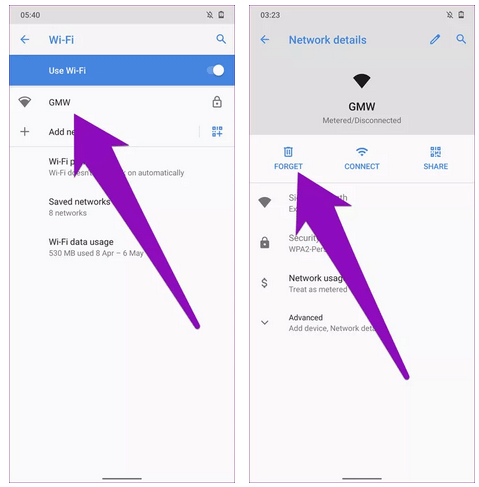
- When the network is forgotten, click on the network from the list to join. Here you have to enter the password once again
Solution 7: Turn Off Private DNS On Android
You may don’t know but private DNS on Android can also make you suffer from such errors. There were many users who reported “Failed to obtain IP address” but solved it after they had disabled private DNS. This has worked for several users and it was fixed on Android 9 Pie and Android 10.
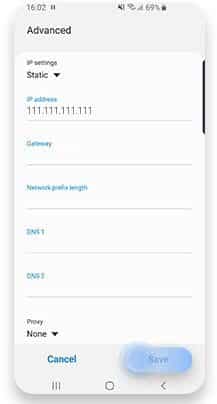
Solution 8: Assign A Static IP To Your Device
When your phone fails to obtain an IP address automatically, you need to enter it manually. This is a temporary solution and you need to set up your network settings again.
Follow the below steps as guided to assign IP:
- First, go to Settings on your phone
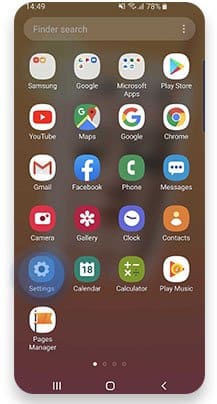
- Then click on Connection
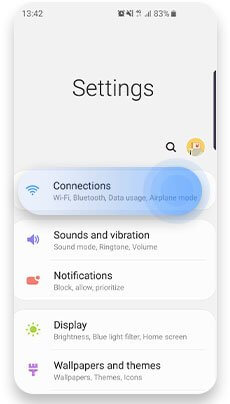
- Now select Wi-Fi
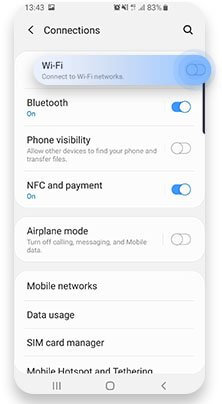
- After that, tap and hold the selected Wi-Fi network and select Forget Network

- Next, you should try reconnecting to the network and tap on the Advanced option under the password
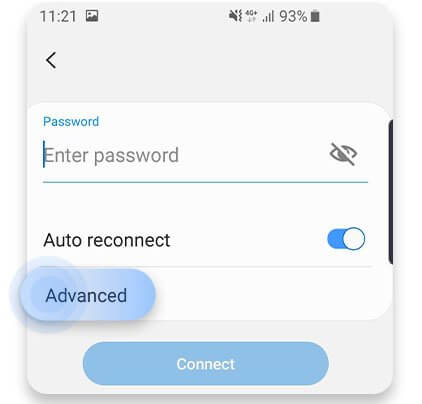
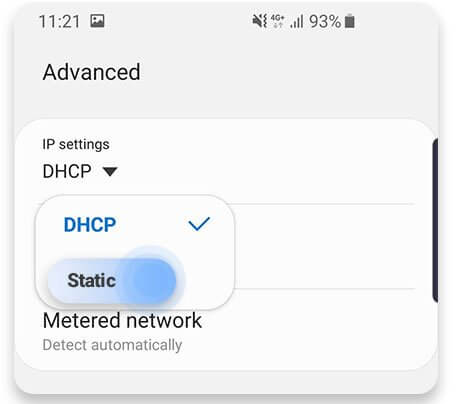
- Now click on the IP Settings menu

- Here you have to choose Static
- And then in the IP Address field, change the last digit of the IP address to a number between 1 and 255
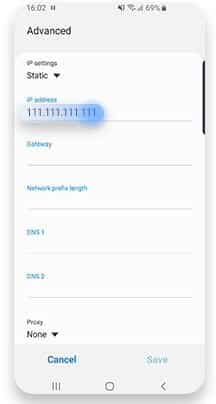
- At last, tap on the Save option and retry to connect to Wi-Fi again
Solution 9: Install FXR Wi-Fi Fix App
There were many users who reported that the FXR WiFi fix app has resolved the error “obtain IP address”. This will help you to get rid of the issue and you can install it from the Google Play Store.
Solution 10: Go Closer To Your Router
When you are not in a range of your connection then you can face such kind of issue to connect your device to the network. Therefore, you should take your device closer to the router and see if the Android OS is able to establish a proper connection with Wi-Fi or not.
Solution 11: Check If Your Device Is Blocked
If your phone is blocked from the Wi-Fi network you are trying to access then also there is a chance to come across the error. When you are able to connect your phone to other Wi-Fi but if anyone’s network is getting stuck on “obtaining IP address” then your phone can be blacklisted.
In addition, you should also check if any other thing like the Mac address configuration is stopping the network. Note here that if the router has some limit of connections then it will be difficult to connect your device to the network. Therefore, it’s important to check your phone’s limitation of the router.
Solution 12: Change Your Device Name
You can also change your device name once and see if the error is resolved. Though the name on the device does not have to do much with network connection still some users suggest it.
Here are the steps you should follow:
- First, open Settings on your phone and click on About phone

- Now click on the Device name
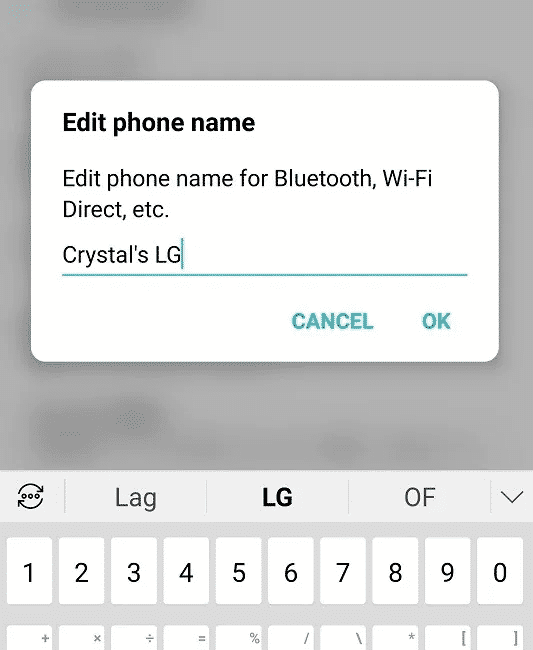
- Here you have to enter a new name for the device and click on OK
- After that, try to connect with the Wi-Fi network once again to check if the issue is resolved
Solution 13: Turn Off MAC Filtering On Your Router
It can happen that the router sometimes rejects your device via a Mac address. If this feature is enabled and the Mac address is not in the whitelist then it’s sure you will go through the “obtaining IP address” error.
In this situation, you have to fix it by going to router settings > search for Mac filtering settings and also make sure your phone is not on the blacklist.

Another thing you can do is to switch off the Mac filter only to understand if obtaining an IP address is causing a problem while connecting to Wi-Fi. And whenever you want, you can switch it on and add your phone to the whitelist.
Solution 14: Check Router’s DHCP Settings
The IP addresses that are assigned to the devices connected are my router’s DHCP server menu. But when these DHCP server settings are disabled then it will not assign an IP address to your device. This can put your device showing an “obtaining IP address” error.
So to solve it, you need to log in to the router’s admin panel and there you have to enable DHCP settings. Even you can assign a static IP address manually during the authentication process. You have to go to Settings > Network & Internet > Wi-Fi. Here you have to switch on Wi-Fi and then follow the below steps:
- First, choose the network that you wish to connect to and click on the Advanced option
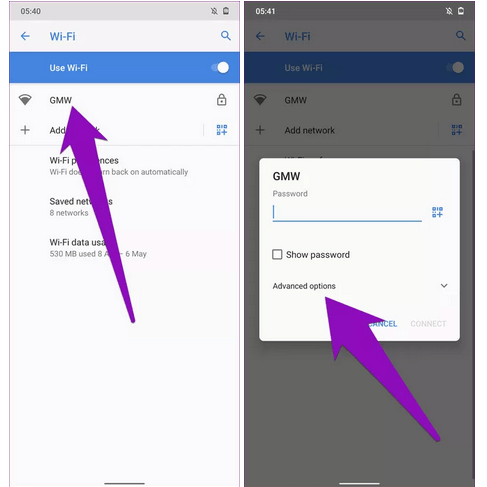
- After that, click on the drop-down button in IP settings and choose Static

- Lastly, enter the Static IP address details you have assigned on the router and press the Connect button once it is done
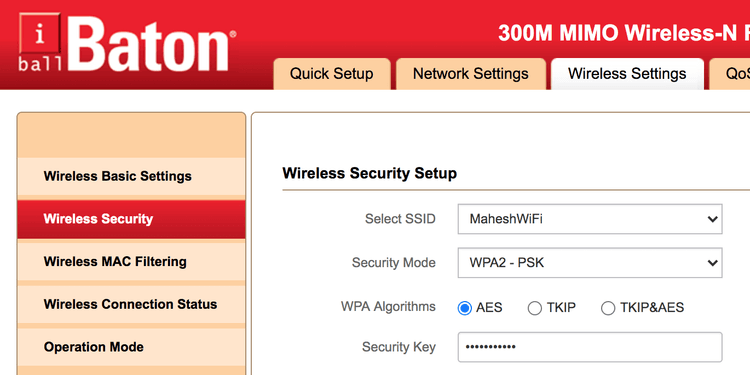
Solution 15: Set Up WPA2-PSK On Your Router
- You have to go to the router’s web interface first
- After that, look for the Wireless security page
- Now select WPA2-PSK as the security code

- Next, choose AES as Encryption type
- After that, click on Save settings
- Now, click on Forget Wi-Fi network
- Finally, reconnect the device to the network once again
Solution 16: Change The Wireless Channel
When your neighbor’s router conflicts with your router’s Wi-Fi then you can come across a “failed to obtain IP address” error. So in that case, you need to use the WiFi Analyzer app so that you can choose the best wireless channel for the router.
Solution 17: Reset Network Settings
Another possible method that can help you to get rid of Wi-Fi stuck on obtaining IP address is resetting the network connection. This feature is available on every Android device and it will not delete any apps or data.
Follow the below steps to reset network settings on your Android phone:
- First, go to Settings > System > Reset Options
- Now choose Reset Wi-Fi, Mobile & Bluetooth
- Then click on Reset settings

- If asked for a password, enter it to confirm the selection
That’s it.
Solution 18: Change Your Wi-Fi’s Encryption Mode
Did you recently switch your router to a new model? If yes then you might want to return and see if some changes occur to fix the issue. This is because most routers offer multiple encryption modes. Even if you have not changed encryption modes, still useful to switch different modes just to check if it helps you to get rid of the error.
Here are the steps to follow:
- First, open your router’s settings and tap on Wireless Settings
- After that, tap on Wireless Security on the screen
- Here you have to choose WPA2-PSK from Security Mode and click on Save Changes.
Solution 19: Factory Reset Your Android Device
If you still facing the same “obtaining IP address” error on your phone screen then it’s time to factory reset your phone. This is the last resort as it can fix the issue. But at the same time, you should also know that this process deletes your data so kindly back up your data before moving ahead.
Now, follow the below steps to reset your Android phone:
- First, go to Settings > Choose System
- Now click on the Reset options that occur on the screen
- Here, choose to Erase all data (factory reset) option

That’s it. Now restart your phone and see if you come across the same error or not.
Wrapping Up
So here, this article comes to an end where it has discussed various solutions to fix Wi-Fi stuck on obtaining IP address. Go through them and apply them to see which one works for you. I hope that all these methods will surely help you to fix “Failed to obtain IP address” on Android phone.
For further suggestions or queries, drop them in the comment section.
You can further reach us through our social sites like Facebook & Twitter

Sophia Louis is a professional blogger and SEO expert from last 11 years. Loves to write blogs & articles related to Android & iOS Phones. She is the founder of Android-iOS-data-recovery and always looks forward to solve issues related to Android & iOS devices
